Talk To An Expert

+91 9924241667

Author name: vainfo

WordPress vs Custom Website Development: Which Should Your Business Choose?
Web Design

WordPress vs Custom Website Development: Which Should Your Business Choose?

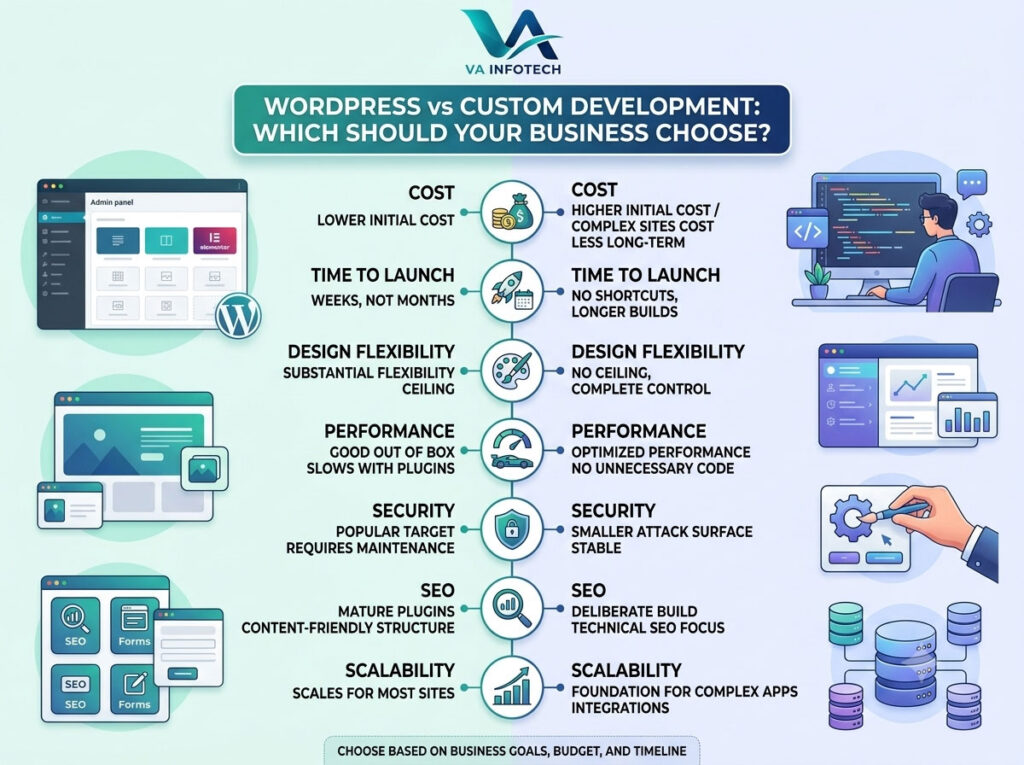
One of the first real decisions every business owner faces when building a website isn’t about colors or fonts — it’s about the platform underneath everything. Should you build on WordPress, or invest in a fully custom-developed website? It’s a question we get asked in nearly every discovery call at Va Infotech, and the honest answer is: it depends on what your business actually needs, not on which option sounds more impressive. WordPress powers a huge share of the web for good reason, but custom development exists because WordPress genuinely isn’t the right fit for every business either. This guide breaks down exactly how the two compare — cost, speed to launch, flexibility, performance, security, SEO, and long-term scalability — so you can make the decision based on your business goals rather than guesswork. What Is WordPress Website Development? WordPress is a content management system (CMS) that powers roughly 40% of all websites globally. It lets you build a site using pre-built themes and plugins, with a visual editor (often paired with page builders like Elementor) that doesn’t require writing code for most day-to-day changes. For businesses that need a professional website without engineering a system from scratch — a services website, a blog, a small catalog, a portfolio — WordPress offers a proven, well-documented foundation. Most website design projects for small and mid-sized businesses start here because it balances speed, cost, and flexibility better than almost any other option at that scale. What Is Custom Website Development? Custom development means building a website (or web application) from the ground up, using a framework and codebase tailored specifically to your business logic — rather than adapting a general-purpose CMS to fit your needs. This approach makes sense when your requirements go beyond what a CMS and its plugin ecosystem can reasonably support: complex user permission systems, proprietary booking or pricing engines, deep integrations with internal software, or performance demands that a plugin-heavy WordPress stack can’t reliably meet at scale. Head-to-Head Comparison 1. Cost WordPress is significantly cheaper to build initially. Themes, plugins, and a large pool of experienced developers keep both development time and hourly rates lower. For most small businesses, this is the deciding factor — and reasonably so. Custom development costs more upfront because every feature is built rather than configured. However, it can cost less over time for complex sites, since you’re not layering paid plugins on top of paid plugins to force a CMS to do something it wasn’t designed for. If budget is your primary constraint right now, it helps to understand realistic pricing before committing either way — we broke down real numbers in How Much Does Website Development Cost in India in 2026?. 2. Time to Launch WordPress wins here decisively for most standard business websites. With existing themes and a mature plugin ecosystem, a professional WordPress site can go live in weeks, not months. Custom builds take longer because there’s no shortcut — every component, from the admin panel to the front-end interface, is designed and built specifically for your use case. If speed to market matters more than exact customization, WordPress is almost always the practical choice. 3. Design Flexibility This is where the comparison gets more nuanced. WordPress, especially with a page builder, offers substantial design flexibility for most businesses — enough to build a genuinely distinctive, on-brand site. But there’s a ceiling. If your brand requires highly specific interactions, animations, or layouts that push beyond what themes and builders are designed to handle, you’ll eventually be fighting the platform instead of building on it. Custom development has no such ceiling — if you can imagine it, it can be built, without being constrained by a theme’s underlying structure. 4. Performance Out of the box, a lean, well-configured WordPress site performs well. The problem is that WordPress sites tend to accumulate plugins over time — one for SEO, one for forms, one for popups, one for security — and each one adds overhead. A WordPress site that started fast can slow down significantly within a year or two if it isn’t maintained carefully. Custom-built sites generally have a performance advantage because there’s no unnecessary code running in the background — only what the business actually needs. For businesses where page speed directly affects conversions (e-commerce, lead generation at scale), this difference is worth taking seriously. 5. Security WordPress’s popularity is also its biggest security liability — it’s the most targeted CMS in the world simply because of its market share, and outdated plugins or themes are the most common entry point for attacks. This isn’t a reason to avoid WordPress; it’s a reason to maintain it properly. Regular updates, a security plugin, and a solid backup strategy close most of the gap. Custom sites have a smaller attack surface by default since there’s no plugin ecosystem to exploit, but they still require the same ongoing diligence. Either way, don’t treat security as a set-it-and-forget-it item — our guide on Website Backup Strategy: How to Protect Your Business Website covers what a proper safety net actually looks like. 6. SEO Both platforms can rank well — SEO success depends far more on execution than on the underlying platform. WordPress has a practical advantage here: mature SEO plugins, a huge base of documentation, and a content-friendly structure that makes it easy to build out blog content, which is one of the strongest long-term SEO levers a business has. Custom sites can be just as SEO-friendly, but every technical SEO element — structured data, sitemap generation, metadata management — has to be deliberately built rather than configured through a plugin. If SEO is core to your growth strategy, make sure whichever platform you choose is paired with a real Search Engine Optimization plan, not just a technically capable site. It’s also worth running through The Complete SEO Audit Checklist for Business Websites once your site is live, regardless of which platform you build on. 7. Scalability For most small-to-mid-sized businesses, WordPress scales
Keyword Mapping: How to Assign the Right Keyword to Every Page
Web Design

Keyword Mapping: How to Assign the Right Keyword to Every Page

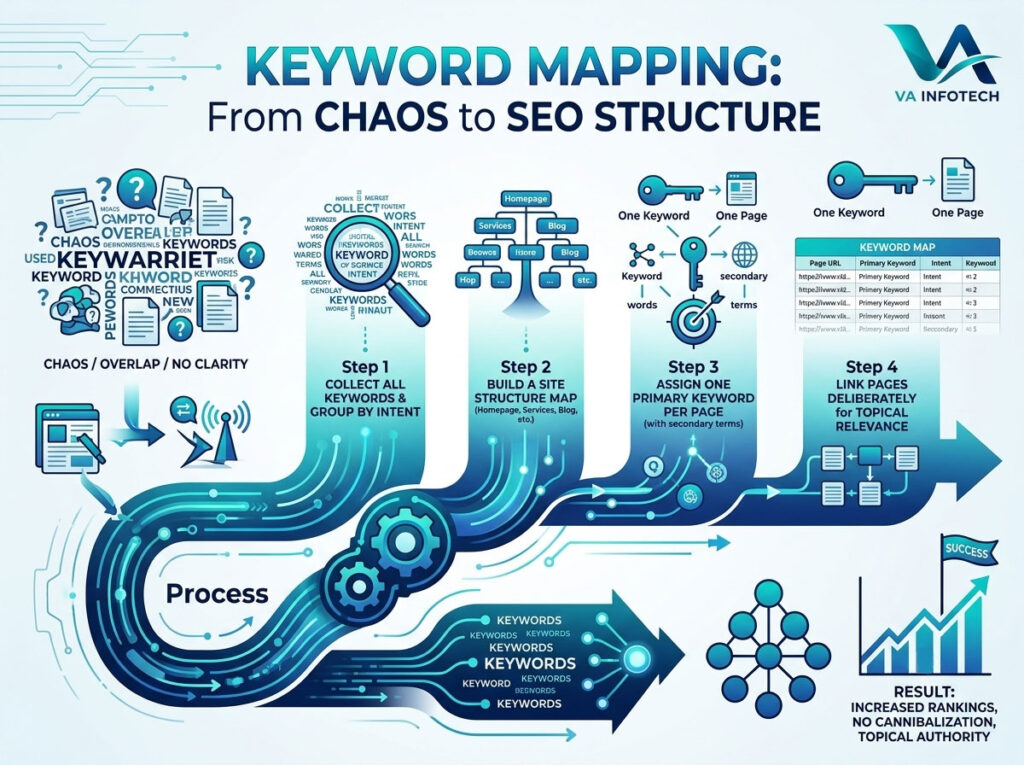
Most websites don’t have a keyword problem — they have a keyword organization problem. There are enough keywords being targeted somewhere on the site, but nobody can say with confidence which page is supposed to rank for which term. Two service pages quietly compete for the same search. A blog post outranks the page that should actually be converting. A brand-new page launches without anyone checking whether it overlaps with something already live. This is what keyword mapping fixes. It’s the process of assigning one clear, primary keyword — plus a small set of supporting terms — to every indexed page on your site, so that every page has a defined job and Google never has to guess which one to rank. Done properly, keyword mapping turns a scattered content strategy into a structured one. Done poorly (or skipped entirely), it’s one of the most common reasons otherwise well-built websites plateau in rankings despite having plenty of content. What Keyword Mapping Actually Means Keyword mapping is not the same thing as keyword research. Research is about discovering what people search for. Mapping is about deciding — deliberately, page by page — which of those discovered keywords belongs where. A completed keyword map is usually a spreadsheet with, at minimum: That’s it. It sounds simple, and structurally it is — but building an accurate one requires real judgment about intent, overlap, and site architecture, which is where most businesses go wrong. Why Skipping This Step Costs You Rankings When pages aren’t mapped, three problems show up repeatedly: Keyword cannibalization. Two or more pages target the same or very similar keyword, so Google has to choose one to rank — and it often picks the “wrong” one, or splits authority between both so neither ranks well. This is one of the most common technical issues we find during a technical SEO audit, and it’s almost always invisible until someone actually maps the site’s keywords against its URLs. Content gaps. Without a map, it’s easy to publish ten blog posts on adjacent topics while never actually covering the specific terms your audience is searching for — and equally easy to miss that a core service has no dedicated page targeting its primary keyword at all. Weak topical relevance. Search engines increasingly evaluate whether a site demonstrates real depth on a subject, not just whether a single page mentions a keyword. A deliberate keyword map is what turns a handful of disconnected pages into a coherent topic cluster that reads as authoritative — to traditional search rankings and, increasingly, to how AI-generated answers decide what to cite as well. Step 1: Start With a Complete Keyword List Before you can assign keywords to pages, you need a full inventory of the terms worth targeting. Pull this from a combination of sources: If your site hasn’t had a full content and technical review recently, this is a natural extension of a broader SEO audit — running the audit first gives you an accurate picture of what’s currently ranking before you start reassigning targets. Don’t filter too aggressively at this stage. It’s easier to prioritize a large list down than to realize later that you excluded a keyword cluster nobody thought to research. Step 2: Group Keywords by Intent, Not Just Topic This is the step most keyword mapping efforts skip, and it’s the one that matters most. Two keywords can be topically related but represent completely different intents — and therefore belong on completely different pages: Grouping by intent first, then by topic, prevents one of the most common mapping mistakes: assigning a high-value commercial keyword to a blog post that was never designed to convert, or stuffing a service page with informational content that dilutes its commercial focus. Step 3: Match Keyword Clusters to the Right Page Type Once your keywords are grouped by intent and topic, match each cluster to the type of page built to serve that intent: If a keyword doesn’t clearly belong to an existing page type, that’s usually a sign you need a new page — not that you should force the term onto something already built for a different purpose. Step 4: Assign One Primary Keyword Per Page Every page gets exactly one primary keyword. Not two, not three — one. This is the term the page’s title tag, H1, URL (where practical), and core content are built around. Alongside it, list 3–8 secondary keywords: close variants, related long-tail phrases, and questions the primary keyword’s searchers also ask. These get worked naturally into subheadings and body content — they support the primary term rather than compete with it. Resist the temptation to make every page target five “important” keywords at once. A page trying to rank for everything usually ranks for nothing, because its content signals are too diffuse for search engines to confidently match to any single query. Step 5: Actively Check for and Resolve Overlap Once your first draft of the map is complete, sort it by primary keyword and scan for duplicates or near-duplicates across pages. Where you find overlap, you generally have three options: This overlap check matters just as much — arguably more — when you’re restructuring an existing site. If you’re planning a redesign or migration, your keyword map should be built and finalized before you touch the site architecture, so it can directly inform your URL structure and redirect plan rather than being reverse-engineered after launch. Step 6: Translate the Map Into On-Page Optimization With every page assigned a primary keyword, the map becomes your on-page SEO brief. For each page, make sure: This is also where a keyword map pays for itself operationally — content writers, designers, and developers all work from the same source of truth instead of guessing at what a page is “about.” Step 7: Use the Map to Drive Internal Linking A keyword map isn’t just an assignment sheet — it’s an internal linking blueprint. Once you know which blog posts support which service pages,

Google AI Overviews SEO: How Businesses Can Increase Their Visibility
Web Design

Google AI Overviews SEO: How Businesses Can Increase Their Visibility

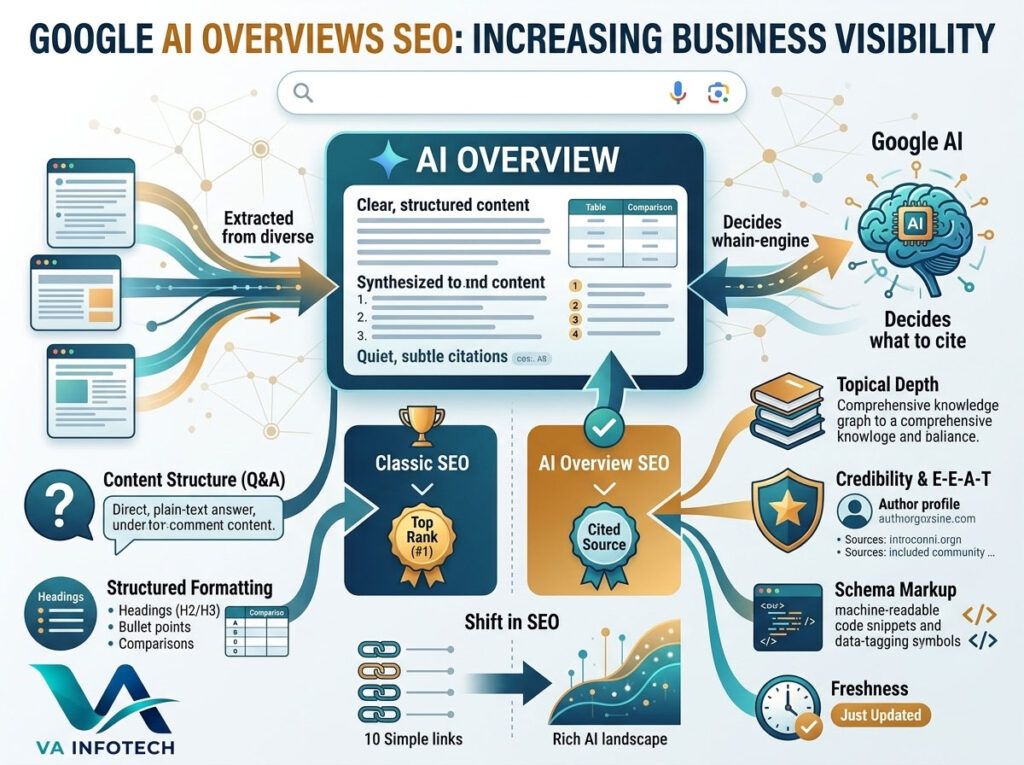
Type almost any question into Google today and there’s a good chance you won’t see ten blue links first — you’ll see an AI-generated summary sitting above them, with a handful of sources quietly credited underneath. That’s Google AI Overviews, and it’s quickly become one of the biggest shifts in how people find businesses online since Google itself launched. For years, the SEO conversation was about rankings: get to position one, and the traffic follows. AI Overviews break that logic. A page sitting at position eight can get cited inside an Overview while the page at position one gets skipped entirely. Visibility no longer depends only on where you rank — it depends on whether Google’s AI considers your content clear, structured, and trustworthy enough to summarize and credit. This guide breaks down what AI Overviews actually are, how they decide what to cite, and the specific, practical steps a business can take to show up inside them — not just below them. What Are Google AI Overviews, Exactly? AI Overviews are AI-generated summaries that Google displays at the top of relevant search results, synthesizing information from multiple web sources into a single written answer. Instead of sending a searcher straight to a list of pages to click through and compare themselves, Google is doing a first pass of that research for them — then linking out to the sources it pulled from. They show up most often for informational queries: “how does X work,” “what’s the difference between X and Y,” “best way to do X.” Transactional and highly local queries still lean more on traditional results and Google Business Profiles, but that line is shifting quickly as the feature expands into more search categories. The important distinction from classic SEO: AI Overviews don’t just rank a page, they extract from it. A page can be well-optimized for keywords and still get skipped by an Overview if its content isn’t structured in a way that’s easy to lift a clean, self-contained answer from. Why This Matters More Than It Might Seem A citation inside an AI Overview tends to carry outsized trust. The searcher isn’t scanning ten options and deciding for themselves who looks credible — Google has already done that filtering, and your business is one of a small number named. That’s a very different kind of visibility than a ranking position, and it converts differently too: by the time someone clicks through from a citation, they’ve already effectively been pre-sold. The businesses treating this as “just another algorithm update” are going to fall behind the ones treating it as a new visibility channel worth optimizing for directly — the same way businesses that took technical SEO seriously years ago outran competitors who didn’t. How Google AI Overviews Actually Select Sources Understanding the mechanics changes how you write for them. A few patterns consistently show up in what gets cited: 1. Content that directly answers a specific question. Overviews favor pages built around a clear question-and-answer structure over pages that bury the answer three paragraphs into a narrative introduction. If someone could ask your page a question and get a clean, standalone answer within a sentence or two, that section is a strong citation candidate. 2. Structured, scannable formatting. Headings, numbered steps, comparison tables, and bullet lists are easier for an AI system to extract cleanly than dense paragraphs. This is part of why a solid content structure has become as important as the words themselves. 3. Topical depth, not just keyword density. AI Overviews tend to pull from pages that cover a topic comprehensively — the same content that also tends to answer several related questions, not just the one that was typed in. A single well-developed page usually outperforms five thin ones targeting slight variations of the same query. 4. Credible, well-structured sources. Authoritativeness still matters, but it’s less about raw domain age and more about whether the page’s information is clear, accurate, and consistent with how the topic is described elsewhere. Structured data (schema markup) plays a growing role here, since it gives Google an explicit, machine-readable signal about what a page is actually saying. 5. Freshness on time-sensitive topics. For anything involving pricing, statistics, tools, or “in 2026” type framing, recently updated content is favored over content that’s technically still accurate but visibly stale. Practical Steps to Increase Your AI Overview Visibility 1. Restructure Content Around Direct Answers Every important page should have at least one section — often the opening paragraph or a dedicated subheading — that answers the core question in two or three plain sentences, before you go into detail. Think of it as writing the summary Google would want to lift, and then expanding on it for human readers underneath. This doesn’t mean dumbing content down; it means putting the conclusion first instead of building up to it. 2. Use Clear Heading Structure and Formatting Break content into logical H2/H3 sections that each answer one sub-question. Use numbered steps for processes, bullet points for lists of options or features, and comparison tables wherever you’re weighing trade-offs — the kind of structure we used in our own breakdown of custom website development vs. website builders, which makes it far easier for both readers and AI systems to extract the exact section they need. 3. Add Structured Data (Schema Markup) FAQ schema, Article schema, and Organization schema all give Google explicit signals about your content instead of forcing it to infer structure from raw HTML. This is one of the more technical levers in AI Overview optimization, and it’s worth pairing with a proper technical SEO audit to make sure your site’s foundation supports it correctly. 4. Build Topical Depth, Not Just More Pages Instead of publishing five shallow posts targeting near-identical keywords, build fewer, deeper resources that thoroughly answer a topic and its related questions. Internal linking between these resources also helps Google understand the full scope of what you cover — which is part of why a consistent SEO

Website Backup Strategy: How to Protect Your Business Website
Web Design

Website Backup Strategy: How to Protect Your Business Website

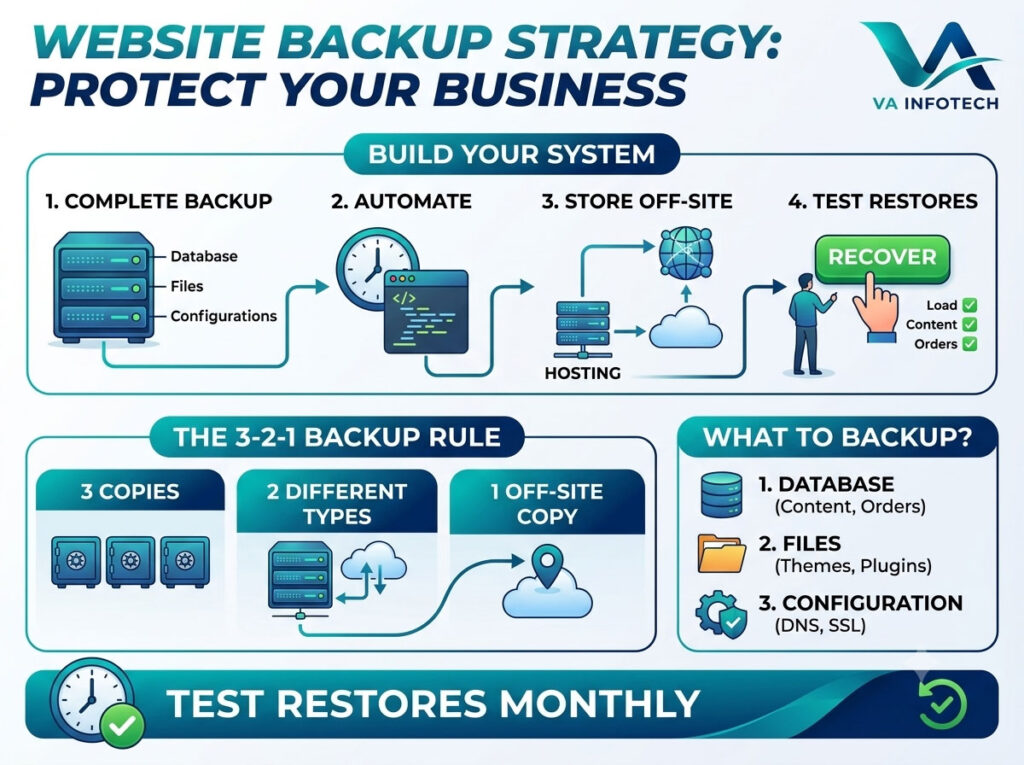
Most business owners only think about their website backup the moment they need one — after a hack, a botched plugin update, a hosting failure, or an accidental delete that takes the whole site down. By then, it’s too late to fix the mistake; you can only find out whether your safety net was actually there. A website backup strategy isn’t a single setting you switch on once. It’s a system: what gets backed up, how often, where it’s stored, how long it’s kept, and — the step almost everyone skips — whether it actually restores when you need it to. This guide walks through how to build that system properly, so a bad day for your website doesn’t become a bad month for your business. Why a Real Backup Strategy Matters More Than You Think A website going down isn’t just an inconvenience. For most businesses, the website is the storefront, the lead-generation engine, and often the first impression a customer ever gets. Every hour it’s down or broken is lost revenue, lost trust, and — if you rank in search — lost SEO momentum that can take months to rebuild. Websites break for reasons that have nothing to do with negligence: None of these are avoidable with 100% certainty. What is avoidable is losing your website permanently because of them. That’s the entire point of a backup strategy — not preventing incidents, but making sure none of them are catastrophic. What “Backup” Actually Needs to Include One of the most common mistakes is backing up only the files — images, themes, and code — while leaving the database untouched. For most modern websites (WordPress, WooCommerce, and most CMS-driven sites included), the database is where your actual content lives: posts, pages, product listings, customer orders, and settings. A files-only backup restores a website that looks right but is missing everything dynamic. A complete backup should cover: Missing any one of these turns a “quick restore” into a multi-day rebuild. How Often You Should Actually Back Up Backup frequency should match how often your site changes — not a generic “weekly is fine for everyone” rule. The 3-2-1 Backup Rule This is the standard that professional IT and hosting teams build around, and it applies just as well to a business website as it does to enterprise data: The off-site copy is the part most businesses skip, and it’s the one that matters most. If your only backup lives on the same server as your live site, a server failure takes out both your website and your safety net at the same time. Store at least one backup in a completely separate location — a different cloud provider, a dedicated backup service, or offline storage. Where to Store Backups Automate It — Don’t Rely on Memory Manual backups fail for one predictable reason: someone forgets. The single highest-leverage thing you can do for your backup strategy is automate it completely, so it runs on schedule without anyone needing to remember. Most modern hosting platforms and CMS backup plugins support scheduled, automatic backups with off-site storage built in — set it up once, and audit it periodically rather than depending on a recurring manual task nobody has time for. Test Your Restores — A Backup You Can’t Restore Isn’t a Backup This is the step almost every business skips, and it’s the one that matters most. A backup file sitting untested in storage is an assumption, not a safeguard. Corrupted backup files, incomplete exports, and version mismatches are common enough that “we have backups” and “we can actually restore from our backups” are two different claims. Build in a restore test on a schedule — quarterly at minimum for most businesses, monthly for anything transaction-heavy: If you’ve never actually tested a restore, treat that as an open risk, not a minor to-do. How Long to Keep Backups (Retention) Keeping every daily backup forever is unnecessary and expensive; keeping too few is dangerous, because some problems (a slow data corruption, a hack that sat undetected for weeks) aren’t discovered immediately. A reasonable retention pattern most businesses can work from: This gives you enough recent restore points for everyday issues, plus older snapshots to fall back on if a problem is discovered late. Recovery Time: Know Your Number Before You Need It Recovery Time Objective (RTO) is simply: how long can your business tolerate the website being down? For a high-traffic e-commerce store, that might be under an hour. For a smaller brochure site, a few hours might be genuinely fine. Knowing this number in advance — rather than discovering it during an actual outage — determines what kind of backup and hosting setup you actually need. A business with a one-hour RTO needs automated, tested, rapid-restore infrastructure; a business with a same-day RTO has more flexibility in how it manages backups. Common Website Backup Mistakes Backup Strategy Differs by Platform Your specific approach depends heavily on how your website is built. A WordPress site typically backs up via plugin or host-level tools covering files and database together. A custom-built website may need a more tailored backup setup across application files, database, and any third-party integrations. If you’re currently deciding between an off-the-shelf builder and a custom-developed site, it’s worth factoring backup and recovery flexibility into that decision — our guide on Custom Website Development vs Website Builders covers how the two approaches differ in control and long-term maintainability, backups included. Backups Are Part of a Bigger Website Health Picture A solid backup strategy protects you from data loss, but it’s one piece of a broader website maintenance routine that also includes security monitoring, uptime checks, software updates, and performance reviews. Businesses that treat these as one ongoing system — rather than isolated tasks handled only when something breaks — consistently avoid the worst-case scenarios. It’s also worth pairing backup discipline with a regular technical health check; our Complete SEO Audit Checklist for Business Websites is a good companion resource, since site

How Much Should a Small Business Spend on Digital Marketing?
Web Design

How Much Should a Small Business Spend on Digital Marketing?

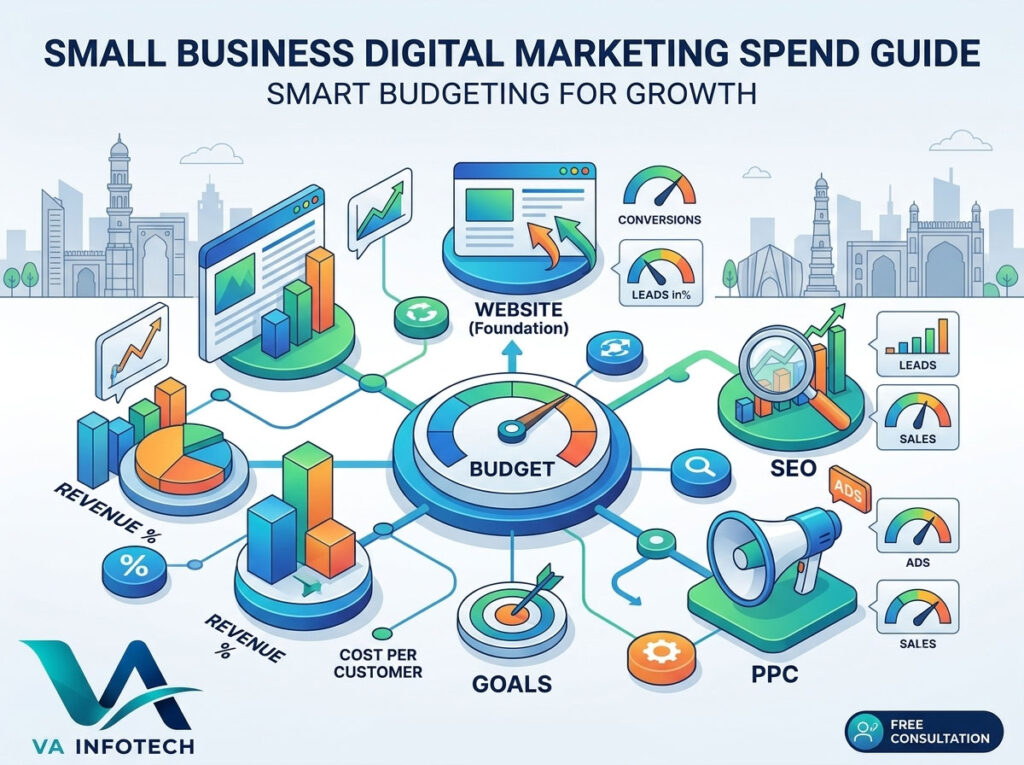
Every small business owner eventually asks the same question: how much should I actually spend on digital marketing? Spend too little and nobody finds you. Spend too much without a plan and you burn cash on ads and tools that never bring a single customer. The honest answer is that there is no single number that fits every business. But there are reliable benchmarks, clear ways to split your budget across channels, and simple methods to check whether your money is working. In this guide, Va Infotech breaks down how to set a small business digital marketing budget that matches your goals, your stage of growth and your industry. Why Your Digital Marketing Budget Matters Most of your customers start their buying journey online. They search on Google, compare options on Maps, read reviews, check your website and look at your social media before they call. If you are missing from any of those places, a competitor gets the enquiry instead. A defined budget does three things for you: Digital marketing is not an expense to minimize. It is a growth investment, and like any investment it needs a target, a timeline and regular review. The Common Budget Benchmarks Start with these commonly used rules of thumb. Treat them as a starting point, not a rule. 1. Percentage of revenue Many small businesses set their total marketing budget between 5% and 12% of annual revenue. Within that, the digital share usually grows every year as more buying moves online. For example, if your business earns ₹50 lakh a year and you decide on 8%, your total marketing budget is ₹4 lakh a year, or roughly ₹33,000 a month. Not all of it needs to be digital, but for most small businesses today, the majority should be. 2. Cost per customer method Work backwards from what a customer is worth to you. If a customer is worth ₹10,000 in profit and you are happy to spend ₹2,000 to win one, then aiming for 15 new customers a month means a monthly budget of about ₹30,000. This method ties spending directly to results and works well for service businesses. 3. Goal-based budgeting Set a specific target first, such as “40 qualified enquiries a month” or “a 30% increase in online orders”. Then research what it costs to reach that goal on each channel. This is the most accurate method, but it needs some data, so it works best after a few months of activity. What Affects How Much You Should Spend Two businesses with the same revenue can need very different budgets. Consider these factors. Your industry and competition. Keywords in legal, real estate, healthcare and education cost far more than those for a local bakery. The more competitors bidding and ranking, the more it takes to be seen. Your business stage. A new business has no reviews, no website authority and no audience. It usually needs more spend early on. Your goals. Brand awareness, lead generation and online sales each need different channels and different budgets. Your current assets. A fast, well-built website with existing content and reviews needs less investment than one that must be rebuilt first. Your location. Targeting one city costs much less than targeting the whole country. Local campaigns are often the best value for small businesses. In-house or agency. Hiring even one full-time marketer can cost more than outsourcing to a specialist team that brings design, SEO, ads and reporting together. How to Split Your Digital Marketing Budget by Channel Here is a sensible starting split for a small business with a combined budget of ₹30,000 to ₹60,000 a month. Adjust the percentages to fit your goals. Channel Suggested share Best for Website and conversion improvements 10% to 20% Turning visitors into enquiries SEO (including local SEO) 25% to 35% Long-term, low-cost lead flow PPC / paid ads 20% to 30% Fast leads and testing offers Social media marketing 10% to 20% Brand building and engagement Content and email 5% to 10% Nurturing and repeat business Tools and reporting 3% to 5% Tracking what works Let’s look at each channel in more detail. Your website: the foundation Every other channel sends people to your website. If it is slow, outdated or hard to use on mobile, the rest of your budget leaks away. Before you spend on ads or SEO, make sure your site loads fast, looks trustworthy and makes it easy to call, book or buy. If your site needs work, professional Website Design is often the smartest first investment. For online sellers, dedicated eCommerce Website Design makes browsing, checkout and payments smooth. And if your current site is simply not performing, a Website Redesign can fix conversion problems without starting from scratch on your brand. Once the site is live, keep it healthy with regular Website Maintenance covering updates, security, backups and speed. Reliable Web Hosting also affects load time and uptime, both of which affect sales and rankings. SEO: your best long-term return Search Engine Optimization takes a few months to build, but the results keep growing and you do not pay for each click. For most small businesses, SEO becomes the cheapest source of leads over time. A good Search Engine Optimization plan covers technical fixes, on-page optimization, content and link building. To start on the right foot, learn how to find high-value keywords for your business so you target searches that actually lead to sales. It also helps to run through this complete SEO audit checklist for business websites to catch problems that hold your rankings back. Search is also changing. People now ask AI tools for recommendations, so it is worth preparing your content for them too. Our Large Language Model SEO service helps businesses appear in AI-generated answers as well as traditional search results. Local SEO deserves special attention. If you serve customers in a specific area, your Google Business Profile can send you calls and visits at very little cost. Follow our local SEO checklist for businesses

Ecommerce SEO Checklist for New Online Stores
Web Design

Ecommerce SEO Checklist for New Online Stores

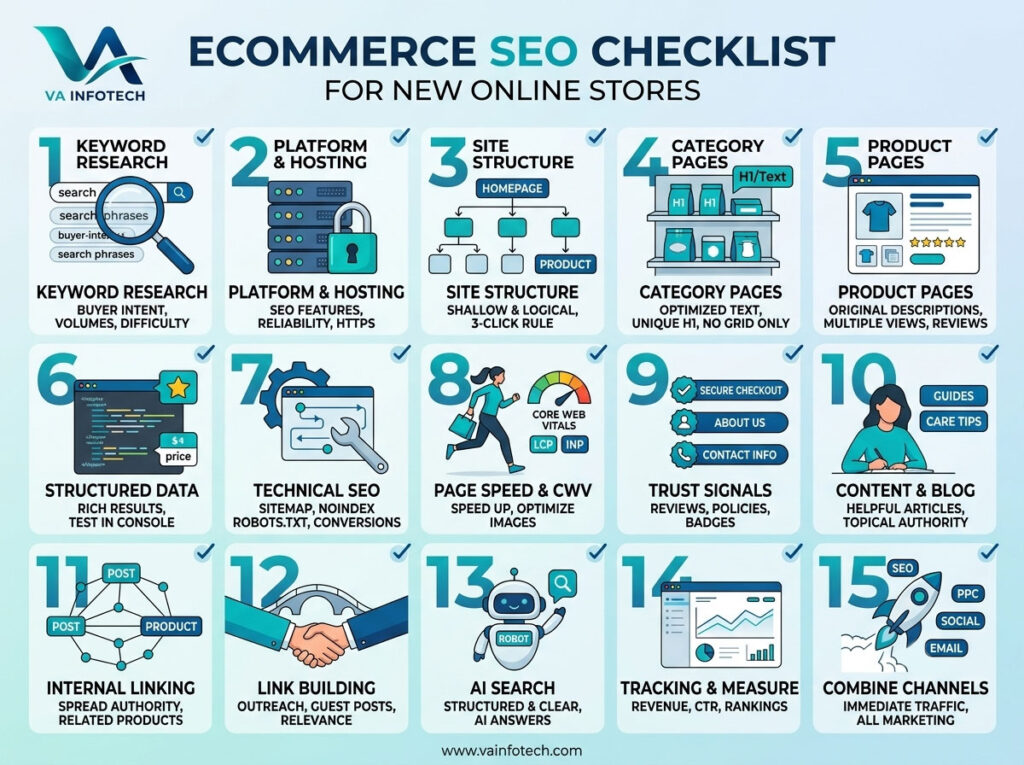
Launching an online store is exciting. You’ve picked your products, designed your storefront, and set up payments. Then you notice that nobody is visiting. That’s normal. A new store has no authority, no backlinks, and no history with Google. Paid ads can bring early traffic, but organic search is what lowers your customer acquisition cost over time. The stores that grow steadily usually did their SEO groundwork before launch, or in the first weeks after it. At Va Infotech, a website design and digital marketing company in Ahmedabad, we help new stores get the basics right from the start. This ecommerce SEO checklist covers what to set up, in what order, and why each item matters. Why Ecommerce SEO Is Different From Regular SEO A service business might have ten to twenty pages. An online store can have thousands of URLs across categories, products, filters, and variants. That creates challenges a normal website doesn’t face: Getting the foundation right means search engines can crawl your store efficiently and understand what you sell. Customers can then find you at the moment they’re ready to buy. 1. Start With Keyword Research Built for Buyers Every SEO decision starts with keywords, and ecommerce keywords are about buying intent. Aim for terms that signal a shopper is close to purchasing, not just browsing. What to do: We cover this process step by step in our guide on how to find high-value keywords for your business. It’s worth reading before you assign keywords to pages. Quick rule: Each category and product page should target one primary keyword and a few close variations. Don’t target the same keyword on two pages, because they’ll compete against each other. 2. Choose the Right Ecommerce Platform and Hosting Your platform and hosting decide how much SEO control you have and how fast your store loads. Before you build: If you haven’t built the store yet, working with an ecommerce website design team that understands SEO can save you expensive rebuilds later. 3. Plan a Clean Site Structure A logical structure helps both shoppers and search engines. The ideal ecommerce structure is shallow and simple: Homepage > Category > Subcategory > Product Checklist: Your main navigation should feature your most important categories. These pages usually carry the most ranking potential, because they target broader, higher-volume searches than individual products. 4. Optimize Category Pages First Category pages are the most overlooked SEO opportunity in ecommerce. Many stores pour effort into product pages and leave category pages as a grid of thumbnails with no text. What a strong category page includes: Don’t stuff keywords. Write for a shopper who’s trying to decide, and the keywords will fit naturally. 5. Write Product Pages That Rank and Convert Product pages are where sales happen, and for a new store they’re often the hardest to rank because so many stores sell the same items. Never use manufacturer descriptions. Hundreds of other stores use the same text, and Google sees it as duplicate content. Write your own. Product page checklist: Think about what a shopper would ask a salesperson standing next to them, and answer it on the page. 6. Add Structured Data (Schema Markup) Structured data helps search engines understand your products and can make your listings eligible for rich results. These can include price, availability, and review ratings shown directly in search. Schema types to consider: After adding schema, test it with Google’s Rich Results Test and monitor errors in Google Search Console. Never mark up information that doesn’t appear on the page, because that violates Google’s guidelines. 7. Fix Technical SEO Before You Scale Technical problems quietly cap your rankings, no matter how good your content is. Run through these before you invest heavily in content or ads. Technical checklist: If you want a full walkthrough, see our guide on how to perform a technical SEO audit step by step. 8. Improve Page Speed and Core Web Vitals Speed affects rankings, but more importantly it affects revenue. Shoppers leave slow stores, and mobile visitors are the least patient. Google measures user experience through Core Web Vitals: loading performance (LCP), responsiveness (INP), and visual stability (CLS). How to speed up your store: Test key pages with PageSpeed Insights and Search Console’s Core Web Vitals report. Ongoing website maintenance keeps speed, security, and plugins in good shape as your catalog grows. 9. Build Trust Signals Into Your Store Google evaluates whether a site is trustworthy, and shoppers do the same before entering payment details. New stores need to work harder because nobody knows them yet. Include: If you have a physical location or serve a specific city, also set up your Google Business Profile. Our guide on how to optimize your Google Business Profile for more customers shows how to do it well. 10. Create Content That Supports Your Products Product and category pages target buyers. A blog or resource section captures shoppers earlier in their journey and builds topical authority. Content ideas for new stores: Each post should link naturally to the relevant category and product pages. That passes authority to the pages that make money and gives readers a next step. Aim for helpful, original, experience-based writing. Google’s systems reward content that demonstrates real expertise, not thin articles written only to catch keywords. 11. Use Internal Linking Strategically Internal links spread authority around your store and help Google discover your pages. New stores often underuse them. Best practices: 12. Start Link Building and Brand Mentions Early Backlinks remain one of the strongest ranking signals, and a brand-new store has none. Focus on quality, relevant links rather than shortcuts. Realistic options for new stores: Avoid buying links or joining link schemes. They can lead to penalties that are hard to recover from. 13. Prepare for AI Search and Answer Engines Shoppers increasingly research products through AI assistants and AI-generated answers, not just traditional search results. Stores that are clearly structured, well-documented, and trusted are more likely to be surfaced and cited. Practical steps:

How to Redesign a Website Without Losing SEO Rankings
Web Design

How to Redesign a Website Without Losing SEO Rankings

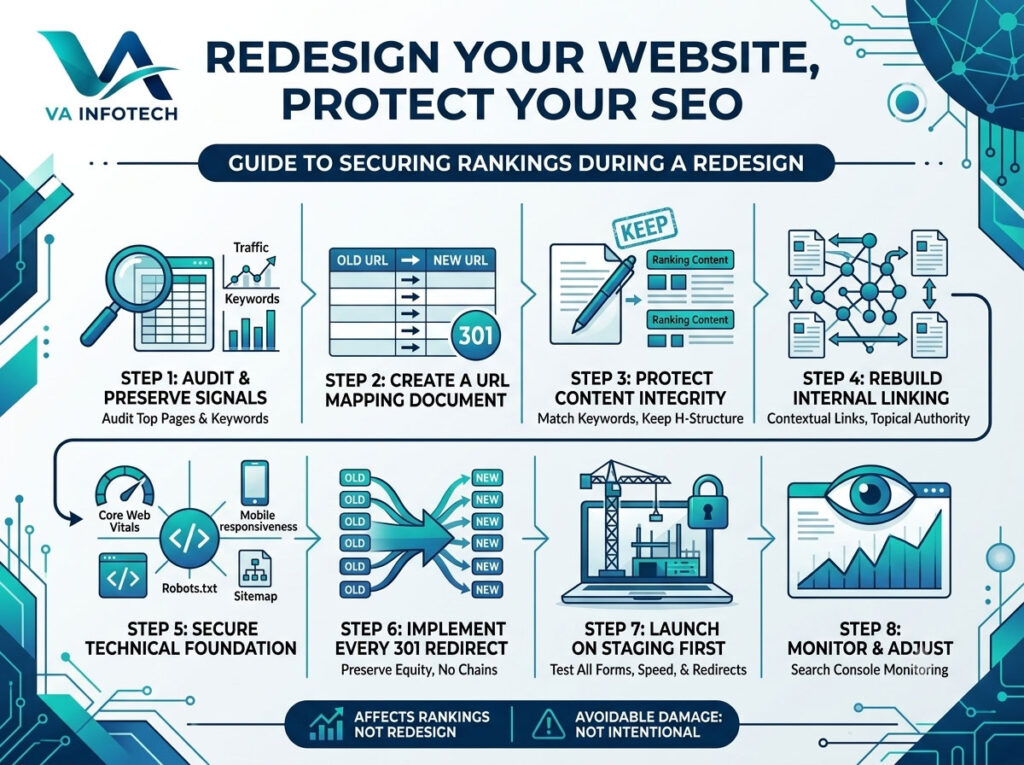
A website redesign is one of the riskiest things you can do to your SEO — not because redesigns are inherently bad, but because most of the damage isn’t intentional. Nobody sets out to lose their rankings. It happens because URLs get restructured without redirects, page content gets rewritten without anyone checking what was actually ranking, or a beautiful new site launches with half the old internal links quietly broken. The frustrating part is that this damage is almost entirely avoidable. Google doesn’t penalize you for redesigning your website — it penalizes you (indirectly) for breaking the signals it relies on to understand and trust your pages. Preserve those signals through the process, and a redesign can actually improve your rankings instead of resetting them. This guide walks through exactly how to plan and execute a website redesign — visually, structurally, technically — without losing the search visibility you’ve already earned. Why Redesigns Tank Rankings in the First Place Before the “how,” it’s worth understanding the “why.” Most ranking drops after a redesign come down to a handful of repeatable mistakes: None of these are design problems. They’re process problems — and a solid process is what fixes them. Step 1: Audit Your Current Site Before You Touch Anything You can’t preserve what you haven’t measured. Before any design work starts, document what your current site is actually doing well. This is essentially the same discipline covered in our complete SEO audit checklist — running that audit before a redesign, not after, is what turns this from guesswork into a controlled process. If your site hasn’t had a proper technical SEO audit in a while, this is the moment to do it, since a redesign will otherwise carry existing technical issues straight into the new site. Step 2: Build a URL Mapping Document This is the single most important artifact in the entire redesign process, and it’s the step most agencies skip. Create a spreadsheet with two columns: old URL and new URL. Every single indexed page on your current site needs a row, even if the new site consolidates or removes it. For pages you’re keeping, map old to new one-to-one. For pages you’re merging or removing, map the old URL to the most relevant surviving page — never to your homepage by default, which is a common shortcut that dilutes relevance and hurts user experience. This document becomes the blueprint for your 301 redirect plan in Step 6, and it’s also what your design and content teams should be working from, so nobody accidentally orphans a page that was quietly driving 20% of your organic leads. Step 3: Preserve (and Improve) Your Content — Don’t Just Reskin It New designs tempt everyone to trim copy. Resist the urge to gut content that’s actually ranking. Before any page gets rewritten: If your business is also thinking about how your content is evaluated beyond classic rankings — including citations inside AI-generated answers — this same discipline matters even more there. We cover that in how to get your business mentioned in AI search results, which shares a lot of overlap with what makes a page survive a redesign intact. Step 4: Rebuild Your Internal Linking Structure Deliberately Internal links are how you tell Google — and your visitors — which pages matter most. A new navigation menu or footer structure can accidentally sever dozens of internal links that were reinforcing your most important pages. Step 5: Protect Your Technical Foundation A redesign often means a new theme, a new CMS, or a full rebuild — and technical regressions are extremely common in that process. Step 6: Set Up 301 Redirects — Every Single One Using your URL mapping document from Step 2, implement 301 (permanent) redirects from every old URL to its new equivalent before the new site goes live. This is non-negotiable if you want to preserve rankings and backlink equity. A few rules that matter here: Step 7: Launch on a Staging Environment First Never redesign a live, indexed website in place. Build the new version on a staging URL, make sure it’s blocked from search engines (via password protection or a staging-specific noindex, not your production robots.txt), and test everything there: Only once staging has been fully tested should you move to launch. Step 8: Monitor Closely for the First 30–60 Days Rankings rarely move instantly after a redesign — Google needs to re-crawl and re-evaluate your new pages, which typically takes a few weeks. During this window: If you notice a sustained drop rather than the normal short-term fluctuation, it’s almost always traceable to one of the mistakes above — a missed redirect, a stripped title tag, or a broken internal link — rather than some invisible “redesign penalty.” There isn’t one. What you’re protecting against is entirely mechanical, which is also why it’s entirely fixable if caught early. Common Mistakes That Undo All of This How Long Does It Take to Recover (or Grow) After a Redesign? If the process above is followed correctly, most sites see minimal disruption — a short dip in the first couple of weeks as Google re-crawls, followed by a return to baseline or better within 4–8 weeks. Sites that skip proper planning can see drops that take months to recover from, simply because the underlying issues (broken redirects, lost content, severed internal links) go undiagnosed for far too long. A redesign is also a genuine opportunity to fix technical debt your old site was carrying — slow load times, poor mobile experience, thin content — which is often why well-executed redesigns come out ahead of where they started, not just even. Final Thoughts A website redesign and strong SEO aren’t in conflict — they only feel that way when the two teams work in isolation, with design changing things SEO never gets a chance to review before launch. The businesses that come through a redesign with rankings intact (or improved) are the ones that treat SEO as part

Custom Website Development vs Website Builders: Which Is Better?
Web Design

Custom Website Development vs Website Builders: Which Is Better?

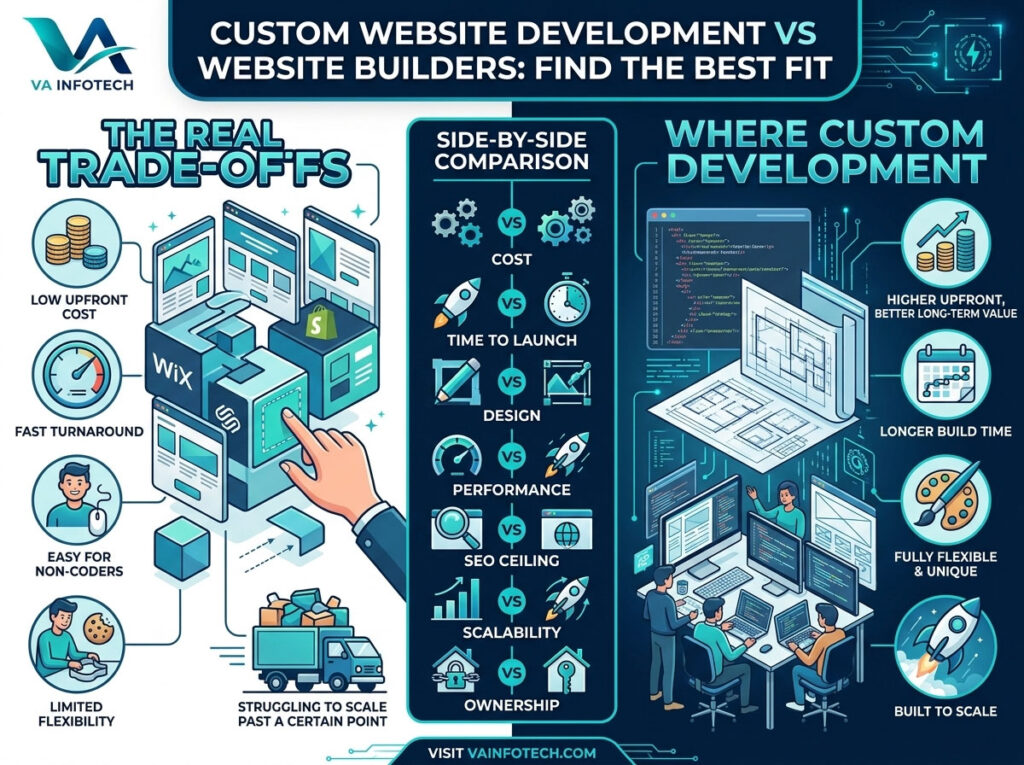
At some point, almost every business owner sits down, opens a laptop, and has the same internal debate: do I just use a website builder and get this done today, or do I invest in custom development and get it done right? Both sides have good arguments. Website builders like Wix, Squarespace, and Shopify’s basic plans promise a live site in an afternoon. Custom development promises something that actually fits the business — but it takes longer and costs more upfront. Neither side is lying to you. The real question isn’t “which one is universally better,” it’s “which one is better for what you’re actually trying to build.” This guide breaks down the real differences — cost, performance, SEO, scalability, and ownership — so you can make that call with your eyes open, instead of discovering the trade-offs eighteen months in. What Counts as a “Website Builder”? Website builders are drag-and-drop platforms where you pick a template, swap in your content, and publish — no code, no developer, no waiting. Wix, Squarespace, GoDaddy Website Builder, and Shopify’s standard themes all fall into this category. WordPress.com (the hosted version, not self-hosted WordPress.org) also behaves like a builder in practice. The appeal is obvious: low upfront cost, fast turnaround, and you don’t need to hire anyone to get a page live today. What Counts as “Custom Website Development”? Custom development means a site built around your specific business — your workflows, your content structure, your integrations, your growth plans — rather than fitted into a pre-made template. This can mean a custom-built WordPress theme, a fully coded site, or a tailored e-commerce platform designed around how your business actually sells. It typically involves a design and development team, a proper discovery phase, and a longer build timeline. In exchange, you get a site that isn’t limited by someone else’s idea of what your industry needs. The Core Trade-Offs, Side by Side Factor Website Builders Custom Development Upfront cost Low Higher Time to launch Days Weeks to months Design flexibility Limited to template/theme options Fully flexible Performance & speed Often bloated with unused builder code Optimized for your specific site SEO ceiling Adequate for basics, limited for advanced technical SEO No structural ceiling Scalability Struggles past a certain size/complexity Built to grow with the business Ownership You’re renting the platform You own the code and structure Long-term cost Recurring fees compound over years Higher upfront, often cheaper over 3–5 years Security Managed by the platform, less control Full control, needs proper maintenance Integrations Limited to what the builder supports Anything you can build or connect This table is the honest version of the comparison — no option wins across every row, which is exactly why the decision depends on your situation rather than a general verdict. Where Website Builders Genuinely Make Sense It’s worth being fair here: website builders aren’t a lesser choice for every business. They’re the right choice in specific situations. 1. You’re validating an idea, not scaling one. If you’re testing whether a business concept has legs before committing serious budget, a builder gets you a functioning site fast, without locking in a large investment on something that might pivot in three months. 2. Your site is genuinely simple. A single-location service business with one page, an address, and a phone number doesn’t need a custom-built architecture. A builder handles that fine. 3. Budget is the primary constraint. If the honest choice is “a builder site now” versus “no site at all,” the builder wins every time. A live, imperfect site beats a perfect site that never launches. 4. You need to move today. Sometimes there’s a genuine deadline — an event, a launch, a press mention — where speed outweighs everything else. Where Custom Development Actually Pays Off 1. Your website is a growth engine, not a brochure. If your business depends on organic traffic, lead generation, or e-commerce revenue, the website is a core business asset — and core business assets are worth building properly rather than renting a template for. 2. You’re competing in a crowded SEO space. Website builders cap out on certain technical SEO capabilities — structured data flexibility, granular URL control, page speed optimization, and crawl efficiency. In competitive niches, that ceiling matters. If your growth strategy depends on organic search, it’s worth reading our breakdown of how to perform a technical SEO audit step by step to see exactly where builder platforms tend to fall short. 3. You need something no template offers. Custom booking flows, unusual product configurators, multi-step quote calculators, non-standard checkout logic — the moment your business needs something a template wasn’t designed for, you’re either paying for expensive workarounds on a builder or building it properly from the start. 4. You’re planning to scale. A builder site that works fine at 50 products often buckles at 5,000. Custom development is built with headroom for growth already factored in — new pages, new services, new markets — rather than requiring a rebuild every time the business outgrows the platform. 5. Page speed and Core Web Vitals actually matter to your business. Builder platforms load a lot of code you didn’t choose and can’t remove — animation libraries, unused theme features, tracking scripts. Custom-built sites carry only what they need, which tends to show up directly in load times and, by extension, rankings and conversions. 6. You’re building an online store with real product complexity. Basic Shopify-style setups are fine for straightforward catalogs. Once you need custom filtering, complex variants, B2B pricing tiers, or deep inventory logic, a purpose-built ECommerce Website Design tends to outperform a stretched builder setup — both in usability and in what it can scale to. The Hidden Cost Most Builder Comparisons Skip Most “builder vs custom” articles compare launch cost and stop there. That’s misleading, because the real cost of a website builder shows up over time, not on day one. None of this means builders are a trap. It means the comparison should be

Google Business Profile SEO: Complete Optimization Guide
Web Design

Google Business Profile SEO: Complete Optimization Guide

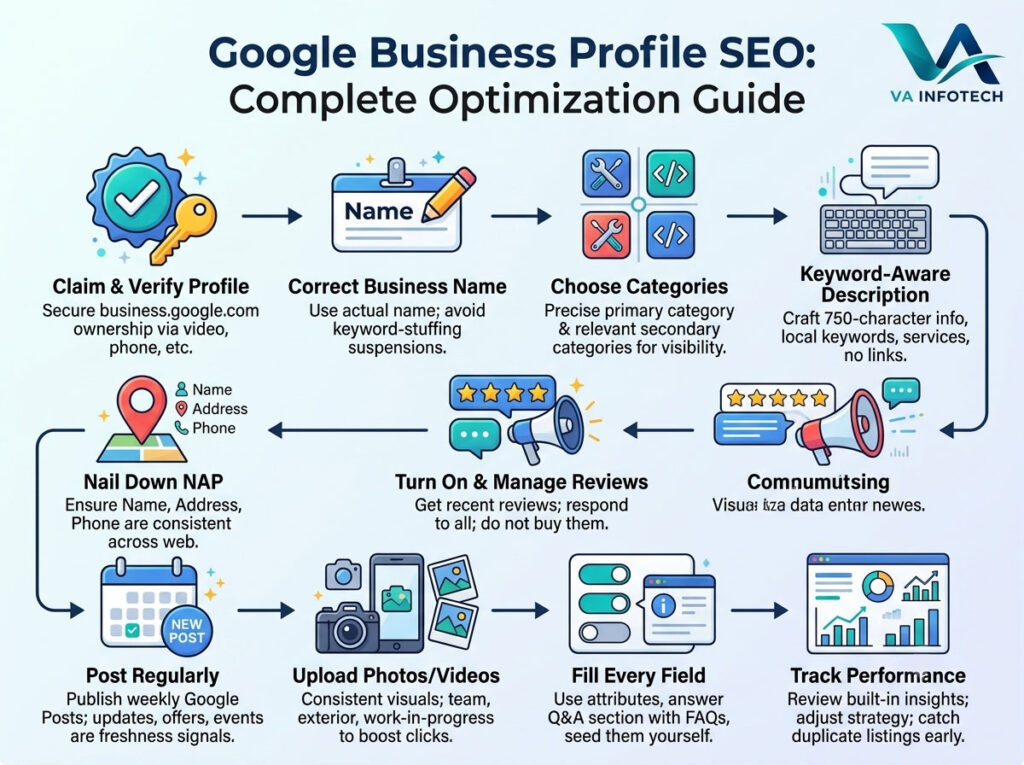
If you run a local business and you’re not showing up in the Google Map Pack when someone nearby searches for what you sell, your Google Business Profile is almost certainly the reason — not your website, not your ads, not your reviews alone. Google Business Profile (GBP), formerly Google My Business, is the single most influential ranking factor for local search visibility, and most businesses only fill in about half of it. This guide walks through every part of a Google Business Profile that actually affects ranking, in the order that moves the needle fastest, so you can go from “listed” to “showing up first.” What Google Business Profile SEO Actually Means Google Business Profile SEO is the process of optimizing your free Google listing so it ranks higher in two places: the Local Pack (the three map results that appear above organic results for local searches) and Google Maps itself. It’s separate from — but closely tied to — your website’s traditional SEO. Google ranks local listings using three core factors: You can’t do much about distance. You can influence relevance and prominence almost entirely through the steps below, and that’s where the actual work lives. Step 1: Claim and Fully Verify Your Profile This sounds obvious, but a huge percentage of local businesses operate on an unclaimed or unverified listing, which caps how high Google will ever rank you — an unverified profile is treated as unreliable, no matter how good the rest of it looks. Claim your profile at business.google.com, and complete verification through whichever method Google offers for your business type: postcard, phone, email, video, or instant verification if you’re already verified through Google Search Console for your domain. Video verification has become far more common in 2026 for service-area and newly listed businesses, so don’t be surprised if that’s your only option — walk through your storefront or work vehicle on camera exactly as instructed. Step 2: Get Your Business Name Exactly Right Your Business Profile name should be your actual, real-world business name — nothing more. Adding keywords like “Best Plumber in Ahmedabad — ABC Plumbing” to game rankings is against Google’s guidelines and is one of the fastest ways to get a listing suspended. Google’s algorithm and its manual review teams both actively look for keyword-stuffed business names, and the penalty (a suspended, invisible listing) is far worse than any short-term ranking boost. If your legal name already contains a location or service descriptor, that’s fine — just don’t add anything that isn’t printed on your signage or invoices. Step 3: Choose the Right Primary and Secondary Categories Category selection is arguably the highest-leverage field on your entire profile, and it’s the one businesses get laziest about. Your primary category should be the single most accurate description of your core business — not the broadest one, and not a stretch. A “website design company” should pick that exact category rather than the more generic “computer service” or “marketing agency,” because Google weights the primary category heavily when matching your listing to search intent. From there, add every secondary category that genuinely applies. There’s no real downside to adding relevant secondary categories, and each one is a chance to surface for an additional set of searches. A web design agency, for example, might reasonably add categories for website designer, internet marketing service, e-commerce service, and web hosting company — as long as each one reflects a service actually offered. Re-check your categories every few months. Google periodically adds new, more specific categories, and switching from a generic one to a newly available, more precise category can produce a visible ranking shift within weeks. Step 4: Write a Complete, Keyword-Aware Business Description The business description field doesn’t carry as much direct ranking weight as categories, but it’s still indexed and still read by Google’s systems — and it’s one of the few places you get to explain, in your own words, exactly what you do and who you do it for. Use your full 750-character allowance. Open with what you do and where you do it, mention your core services naturally (not stuffed), and include your city or service area at least once. Avoid links, phone numbers, and promotional language like “best” or “#1” — Google disallows these in the description field, and profiles that include them can be flagged during review. Step 5: Nail Down Your NAP Consistency NAP stands for Name, Address, and Phone number, and consistency across every place your business appears online — your website, GBP, Facebook, directory listings, industry associations — is one of the more underrated local ranking signals. If your website footer says “+91 9924241667” and your Google Business Profile says “099242 41667,” that inconsistency, multiplied across dozens of directories, makes it harder for Google to confidently confirm your business is legitimate and consistently located where you say it is. Run a quick audit: pull up your listing on Google, your website footer, and any directories you’re listed on (Justdial, IndiaMART, Sulekha, industry-specific directories), and make sure the name, address, and phone number match exactly, character for character, everywhere. Step 6: Turn On and Actively Manage Reviews Review count and review recency are two of the strongest prominence signals Google uses, and they’re also the factor most business owners neglect until it’s too late. A few things matter more than most owners realize: Step 7: Post Regularly Using Google Posts Google Posts are the update/announcement feature inside your Business Profile that lets you publish offers, events, product updates, and general news directly to your listing. They expire after seven days (except event posts, which run until the event ends), which means an active posting habit is itself a freshness signal Google can measure — a dormant profile with no posts in six months reads very differently to Google’s systems than one updated weekly. A simple, sustainable cadence — one to two posts a week covering offers, recent projects, or seasonal updates — keeps your profile “active”

How to Optimize Your Google Business Profile for More Customers
Web Design

How to Optimize Your Google Business Profile for More Customers

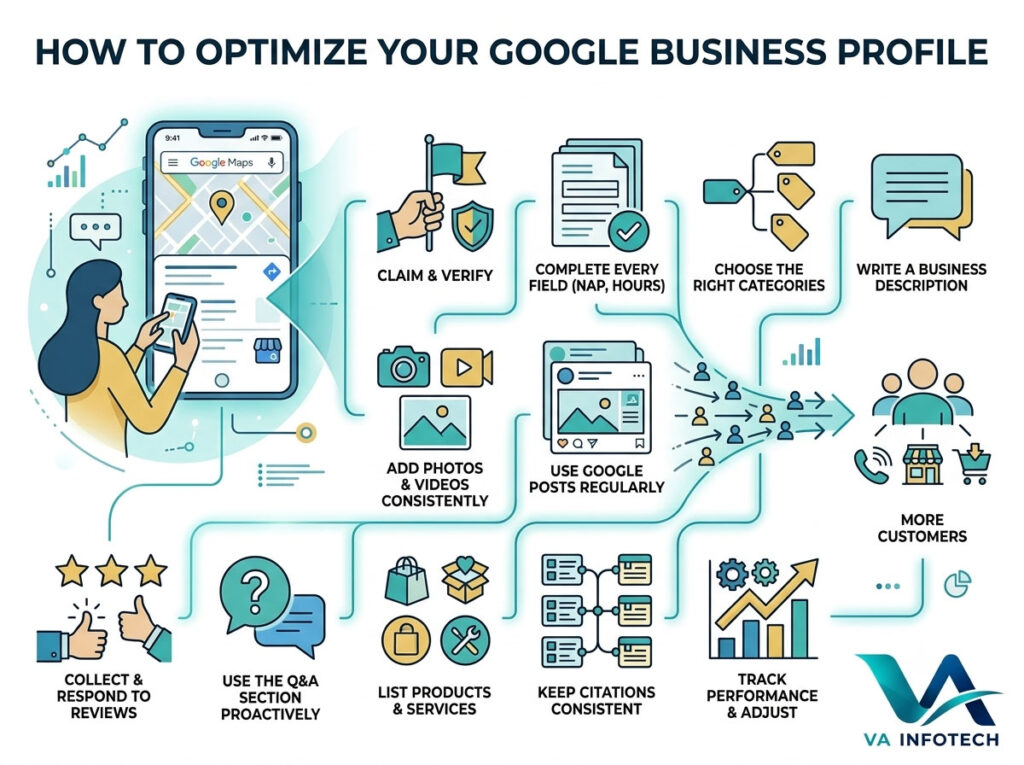
Search “plumber near me,” “best bakery in Ahmedabad,” or “dentist open now,” and the first thing you see isn’t a website — it’s a map, a cluster of business names, a star rating, and a handful of photos. That block of results is the Google Business Profile (GBP), formerly known as Google My Business, and for most local businesses, it’s the single most influential piece of digital real estate they own. The problem is that most businesses claim their profile once, fill in a phone number, and never touch it again. That’s a missed opportunity. Google Business Profile isn’t a static listing — it’s a living, ranking signal that Google actively evaluates based on completeness, accuracy, engagement, and freshness. A neglected profile quietly loses visibility to competitors who are putting in the work, even if their actual business isn’t better. This guide walks through exactly how to optimize your Google Business Profile — field by field, decision by decision — so it does what it’s supposed to do: turn nearby searches into paying customers. Why Google Business Profile Optimization Matters So Much Before getting into the how, it’s worth understanding why this one listing carries so much weight. Local searches — anything with “near me,” “in [city],” or an implied location — now make up a massive share of all Google searches, and they convert far better than generic national queries. Someone searching “car service near me” isn’t casually browsing. They’re ready to call, visit, or book, often within hours. Google Business Profile is the primary way your business shows up for exactly that kind of high-intent search, both in the Local Pack (the map and three-listing block at the top of search results) and in Google Maps itself. Unlike your website, where ranking depends heavily on backlinks, content depth, and domain authority, your Business Profile ranking depends on a different mix of signals: relevance, distance, and prominence — and prominence is where optimization does the most work. A complete, active, well-reviewed profile consistently outranks a thin, outdated one, regardless of how big the business behind it is. In other words, this is one of the few areas in digital marketing where a small business can genuinely outrank a much larger competitor, simply by doing the fundamentals properly and consistently. Step 1: Claim and Verify Your Profile This sounds obvious, but a surprising number of businesses are operating with an unclaimed or unverified profile — which means someone else could technically edit your business information, and you’re locked out of key features like posts, messaging, and insights. To claim your profile: Until verification is complete, most of the optimization steps below either won’t be available or won’t be trusted by Google. This is step zero, not an optional add-on. Step 2: Fill Out Every Field Completely and Accurately Google explicitly favors complete profiles over incomplete ones, and incomplete information also directly costs you customers — someone who can’t find your hours or exact address will simply choose the next listing. At minimum, this means: Every one of these fields is a small trust signal, and together they form the profile “completeness score” Google factors into local ranking. Step 3: Choose the Right Categories Category selection is one of the most underrated ranking factors in the entire profile. Google uses your primary category, in particular, to understand what kind of business you are and which searches you should appear for. A few principles here: Step 4: Write a Business Description That Actually Describes You The business description field is a genuine opportunity to communicate what makes you different — not just a place to repeat your name and address. Google gives you up to 750 characters; use them. A strong description typically: This isn’t a major direct ranking factor on its own, but it directly affects conversion — it’s often the deciding factor between two similarly-rated businesses in the same search results. Step 5: Add Photos and Videos — Consistently Profiles with photos receive significantly more engagement than those without, and businesses that add photos regularly tend to see more direction requests and website clicks than those that upload once and stop. What to prioritize: Treat this the same way you’d treat your product photography on your website — genuinely useful, high-quality images consistently outperform generic or stock visuals, both for engagement and for how seriously customers take the listing. Step 6: Use Google Posts Regularly Google Posts function similarly to a social media feed directly inside your Business Profile — updates, offers, events, and announcements that appear to anyone viewing your listing. This is one of the most underused features on most profiles, largely because posts expire after seven days (except event and offer posts) and businesses forget to keep them current. But active posting is also a freshness signal Google can factor into visibility, and it gives you a free, direct channel to promote offers, new services, or seasonal updates without waiting for a website update to go live. A simple, sustainable approach: one post a week, tied to something genuinely current — a new service, a seasonal offer, a recent project, or an upcoming event. Step 7: Collect and Respond to Reviews — Deliberately Reviews are one of the strongest prominence signals Google uses, and they’re also the single biggest factor in whether a customer chooses you over the next listing down. Star rating, review volume, review recency, and how you respond to reviews all factor in. A few practical points: Step 8: Use the Q&A Section Proactively The Questions & Answers section lets anyone — not just verified customers — post a question about your business, and anyone can answer, including other users. Left unmanaged, this can end up with incorrect or outdated answers sitting at the top of your listing. The fix is simple but often skipped: seed the section yourself with the questions customers actually ask (parking availability, appointment requirements, payment methods, etc.), and monitor it regularly so new questions get an accurate answer

Scroll to Top