You have decided to move your website. Maybe you are switching hosts, changing your domain name, moving to a new platform or launching a fresh design. The excitement is real. So is the risk. A poorly handled migration can wipe out years of SEO progress in a few days, and recovering lost rankings can take months.
The good news is that a website migration does not have to hurt your search visibility. With careful planning, a clear checklist and thorough testing, you can move your site and keep your rankings, traffic and leads. At Va Infotech, we handle migrations for businesses of every size, and this guide shares the exact process we follow.
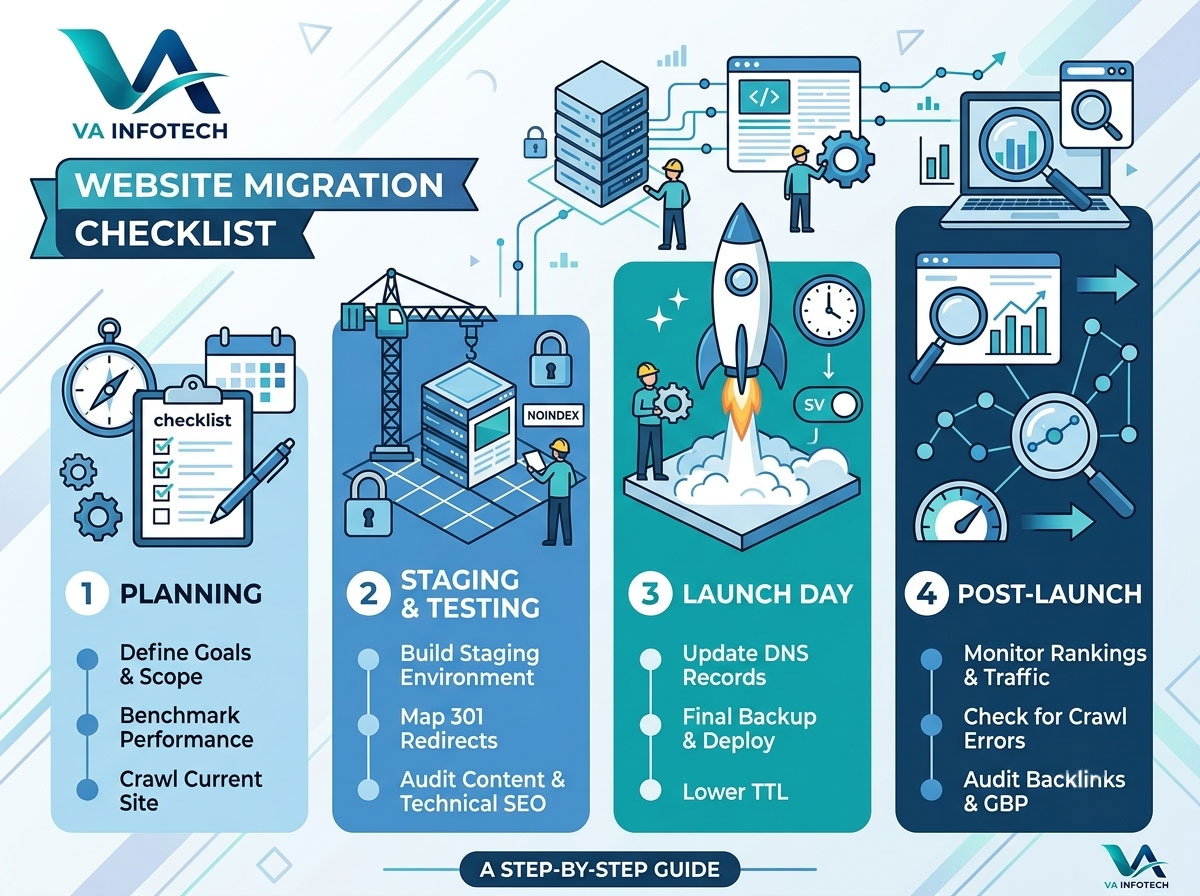
Whether you are doing it yourself or working with a team, use this website migration checklist from the first planning meeting to the final post-launch check.
What Is a Website Migration?
A website migration is any major change to your website that can affect how search engines find, crawl and rank it. The most common types are:
- Hosting migration: moving to a new server or hosting provider, with the same domain and design.
- Domain migration: changing your domain name, for example from an old brand name to a new one.
- Platform migration (CMS change): moving from one system to another, such as from a website builder to WordPress.
- Redesign migration: changing the structure, URLs, navigation or content during a website redesign.
- HTTPS migration: moving from HTTP to a secure HTTPS version.
- Merger or consolidation: combining several websites into one.
Some projects combine several of these at once. The more you change, the higher the risk, so plan accordingly.
Why Migrations Damage SEO
Search engines have already learned your site. They know your URLs, understand your content and have assigned trust and relevance to your pages. When you move, you are asking them to relearn everything. SEO losses usually come from a handful of avoidable mistakes:
- Old URLs that return 404 errors because nobody redirected them.
- Redirects pointing to the wrong pages, or to the homepage.
- Pages accidentally blocked from crawling or indexing.
- Lost titles, headings, internal links or structured data.
- Slower pages on the new site.
- Broken tracking, so problems stay invisible.
Every one of these can be prevented. Let’s go through the checklist.
Phase 1: Plan Before You Touch Anything
Step 1: Define the goals and the scope
Write down exactly what is changing and why. Is it only the hosting? The domain? The design and URLs too? Decide who owns each task, set a launch date and avoid launching during your busiest sales period. If you are still deciding on a platform, our comparison of custom website development vs. website builders and the guide on WordPress vs. custom website development can help you choose before you start.
If you are building a new structure at the same time, it also pays to plan your business website before starting development.
Step 2: Benchmark your current performance
You cannot measure a loss if you do not know the starting point. Before migration, record:
- Organic traffic, conversions and leads from Google Analytics.
- Clicks, impressions, average position and top queries from Google Search Console.
- Rankings for your 20 to 50 most important keywords.
- Your top pages by traffic, backlinks and conversions.
- Page speed and Core Web Vitals scores.
- The number of indexed pages.
Export everything to a spreadsheet and save it. This becomes your before-and-after comparison.
Step 3: Crawl your existing website
Use a crawler such as Screaming Frog, Sitebulb or a similar tool to collect every URL on your current site. For each page, capture the URL, status code, title tag, meta description, H1, canonical tag, internal links and word count. This is your master inventory. If you are not sure what to look for, our technical SEO audit guide and complete SEO audit checklist walk through each element.
Step 4: Decide what to keep, improve or remove
A migration is a good moment to clean up. Sort your pages into three groups:
- Keep: pages that bring traffic, links or sales.
- Improve: pages with potential but thin or outdated content.
- Remove or merge: duplicate, outdated or low-value pages.
Do not delete pages that have backlinks or steady traffic without a redirect to a close replacement. Every removed page needs a plan.
Step 5: Take a full backup
Before any change, back up the files, the database and your configuration settings. Store a copy somewhere other than your hosting account. A tested backup is your safety net if something goes wrong during the move. Our guide on website backup strategy explains how to do it properly.
Phase 2: Build and Test on a Staging Site
Step 6: Set up a staging environment
Build the new site on a private staging server, never directly on the live one. Block search engines from the staging site with password protection or a noindex directive so it does not get indexed. Just as importantly, remember to remove that block at launch. Forgetting this is one of the most common and costly migration mistakes.
Step 7: Create your URL redirect map
This is the most important part of the entire migration. A redirect map lists every old URL and the new URL that replaces it.
- Use 301 (permanent) redirects, which tell search engines the move is permanent and pass most ranking signals to the new address.
- Redirect each old page to the most relevant new page, not simply to the homepage.
- Avoid redirect chains (A to B to C). Point each old URL straight to its final destination.
- Include images, PDFs and other files that earn traffic or links.
- Check your backlink profile and make sure every important linked URL is covered.
If URLs stay the same because you are only changing hosts, you still need to confirm that every URL works on the new server.
Step 8: Carry over all on-page SEO elements
A new design or platform often strips out important details. Check that the following move across correctly:
- Title tags and meta descriptions
- H1 and heading structure
- Body content and optimized copy
- Image alt text and file names
- Internal links and navigation
- Canonical tags
- Structured data and schema markup
- Open Graph and social tags
- Hreflang tags for multilingual sites
Revisit your keyword mapping so every page still targets the right search term, and confirm the new pages still match the search intent they ranked for before.
Step 9: Check technical SEO on staging
Before launch, test the new site for:
- Robots.txt: it should allow crawling of important sections.
- XML sitemap: the new sitemap lists only live, indexable URLs.
- Status codes: no unexpected 404 or 500 errors.
- Mobile friendliness: pages work well on phones.
- Page speed: the new site loads as fast as or faster than the old one. See why sites slow down in our guide on why website speed gets slower over time.
- SSL certificate: installed and ready for HTTPS.
- Canonical tags: pointing to the correct new URLs.
Choosing dependable web hosting with good server speed and uptime also protects the performance you have worked to build.
Step 10: Protect user experience and conversions
SEO does not end with rankings. If visitors arrive and cannot find what they need, you still lose business. Test forms, buttons, checkout, phone links, chat tools and key journeys. Read about how user experience affects website conversion rates and the difference between website UX and UI so the new design helps, not hurts.
For online stores, pay special attention to product and collection pages. Our guides on product page SEO and category page SEO show what to preserve, and our eCommerce website design team can help you migrate a store safely.
Step 11: Set up tracking and tools
Make sure Google Analytics, Google Tag Manager, conversion tracking, ad pixels and heatmaps are installed on the new site. Add and verify the new property in Google Search Console if the domain is changing. Broken tracking is a silent killer, because you only notice it after weeks of missing data.
Phase 3: Launch Day Checklist
Choose a low-traffic time and keep the team available. Then work through this list in order:
- Lower your DNS TTL a day or two before launch so changes spread faster.
- Take a final backup of the old site.
- Switch DNS or deploy the new site to the live server.
- Remove the staging noindex block and any password protection.
- Update robots.txt so search engines can crawl the new site.
- Activate your 301 redirects and test a sample of the most important ones.
- Confirm HTTPS works, with no mixed-content warnings.
- Submit the new XML sitemap in Google Search Console.
- Use the URL Inspection tool on your key pages to request indexing.
- Check forms, checkout and tracking with real test submissions.
If your domain name is changing, also use the Change of Address tool in Google Search Console, which only applies when you move from one domain to another. Keep the old domain registered and the redirects active.
Phase 4: Post-Migration Checklist
The work is not finished at launch. The first few weeks decide whether your SEO holds.
Week 1
- Crawl the new site again and compare it with your original inventory.
- Look for 404 errors, redirect chains, missing titles and blocked pages.
- Check Search Console for crawl errors and indexing problems.
- Confirm your analytics are recording traffic and conversions.
- Monitor site speed and uptime.
Weeks 2 to 4
- Compare rankings, impressions and clicks to your benchmark.
- Fix any broken internal links and update old links to point directly to new URLs.
- Ask important websites that link to you to update their links to the new addresses.
- Update your Google Business Profile, social profiles, directories and email signatures with the new URL. Our Google Business Profile optimization guide covers this in depth.
- Review local visibility, especially if you rely on nearby customers. See how to get more local leads from Google search.
Months 2 and 3
- Keep monitoring traffic and rankings every week.
- Leave 301 redirects in place for at least a year, and longer for pages with strong backlinks.
- Refresh content, improve weak pages and keep publishing.
- Measure the impact of the move on leads and revenue. Our guide on how to calculate digital marketing ROI shows how.
Some temporary ranking movement is normal after a migration. Search engines need time to recrawl and reprocess your pages. If traffic stays well below your benchmark after several weeks, go back to your redirect map and crawl data, because the cause is usually a specific, fixable issue.
Special Cases to Plan For
Changing your domain name
Domain changes carry the most risk, because you are moving the whole identity of your site. Redirect every old URL to its exact equivalent on the new domain, use the Change of Address tool, update your backlinks where you can, and keep the old domain active for a long time. Expect a longer settling period than a simple hosting move.
Moving to HTTPS
Redirect every HTTP URL to the HTTPS version, update canonical tags and sitemaps, fix mixed content and update internal links. Verify the HTTPS version as a property in Search Console.
Multilingual and multi-location sites
Keep hreflang tags accurate and check that language or country versions redirect to the right equivalents rather than a single default page.
E-commerce migrations
Protect product URLs, structured data, reviews, filters and category pages. Avoid taking products offline during the switch, and test the entire checkout flow before and after launch.
Common Website Migration Mistakes to Avoid
- Launching without a redirect map. This causes the largest and fastest ranking loss.
- Leaving the staging noindex tag live. Your new site then asks Google not to index it.
- Redirecting everything to the homepage. Search engines treat this like a soft 404.
- Changing too much at once. Whenever possible, separate a redesign from a domain change.
- Skipping the backup. Without one, a failed move can mean permanent data loss.
- Ignoring page speed. A prettier site that loads slowly can lose rankings.
- Forgetting tracking. You cannot fix what you cannot measure.
- Removing redirects too soon. Keep them in place for at least 12 months.
- Not monitoring after launch. Problems found in week one are much cheaper to fix.
Quick Website Migration Checklist
- Goals, scope and launch date agreed
- Baseline traffic, rankings and speed recorded
- Full crawl of the old site completed
- Content audit done (keep, improve, remove)
- Full backup stored off-site
- Staging site built and blocked from search engines
- One-to-one 301 redirect map prepared
- Titles, headings, schema and internal links transferred
- Robots.txt, sitemap, canonicals and SSL tested
- Mobile and speed checks passed
- Analytics and conversion tracking installed
- Staging block removed at launch
- Redirects live and tested
- Sitemap submitted and key pages inspected
- Post-launch crawl and error fixing completed
- Rankings and traffic monitored for at least 3 months
- Old redirects kept for 12 months or longer
When Should You Get Professional Help?
A small brochure website with the same URLs can often be moved with careful planning. But if your site has hundreds of pages, brings in significant leads or sales, or you are changing domains, platforms and design at once, expert help is worth the cost. A single missed redirect map can cost far more than the migration itself.
After the move, consistent care keeps your site healthy. Our website maintenance service handles updates, security and backups, while search engine optimization and digital marketing help you rebuild momentum and grow after launch. As search evolves, it also helps to prepare for AI-driven discovery. Read about Google AI Overviews SEO and how to get your business mentioned in AI search results, or explore our Large Language Model SEO service.
Final Thoughts
A website migration is a big project, but it is also a chance to build a faster, cleaner and more effective site. The businesses that keep their SEO are the ones that plan early, map every URL, test on staging, launch carefully and monitor closely afterward.
If you want a team that has done this many times, Va Infotech can manage your migration from planning to post-launch monitoring. We offer website design, hosting, SEO and ongoing support under one roof. Explore our portfolio to see our work, contact Va Infotech for a free consultation, or read more tips in the Web Design category and on the Va Infotech blog.
Frequently Asked Questions
Will I lose my rankings if I migrate my website? Not necessarily. A well-planned migration with correct 301 redirects, preserved content and thorough testing can keep your rankings stable. Small temporary fluctuations are normal while search engines reprocess your site.
How long does a website migration take? A simple hosting move can take a day or two. A full redesign with a new structure, or a domain change, can take several weeks of planning, building and testing. Allow extra time for post-launch fixes.
How long does it take for SEO to recover after a migration? It depends on the size of the site and the type of change. Many sites settle within a few weeks when the migration is handled well, but larger or more complex moves can take longer. Recovery depends mostly on how clean the redirects and technical setup are.
What is a 301 redirect and why does it matter? A 301 redirect permanently sends visitors and search engines from an old URL to a new one. It helps preserve ranking signals and prevents broken pages.
Should I keep my old domain after changing domains? Yes. Keep the old domain registered and its redirects active for at least a year, ideally longer, so visitors and links keep reaching your new site.
Can I change my design and URLs at the same time? You can, but it raises the risk. If possible, move in stages, or be extra careful with your redirect map and testing.
Do I need to tell Google about a migration? For a domain change, use the Change of Address tool in Google Search Console. For every migration, submit your new sitemap and monitor indexing through Search Console.
How can Va Infotech help with my website migration? Va Infotech plans the move, builds and tests the new site, prepares the redirect map, launches it safely and monitors your SEO afterward. Contact us for a free consultation.
Want help applying this to your website?
Tell us about your business and goals. We will review your site and suggest clear next steps, free of charge.